Mastering the WordPress Toolbar: Your Ultimate Guide to Effortless Website Management
Note: This post may contain affiliate links; I may earn a commission (at no extra cost to you) if you make a purchase via my links. See my disclosure for more info.

As a web designer, I’ve seen countless clients struggle with their WordPress sites. But I’ve got two secret weapons to share with you today: the WordPress toolbar and Screen Options. These often-overlooked features are the keys to streamlining your site management and boosting your productivity. Let me show you how to unlock their full potential.
Table of Contents
The WordPress Toolbar: Your Site’s Swiss Army Knife
When you log into your WordPress site, you’ll notice a black bar at the top of your screen. That’s the WordPress toolbar, and it’s about to become your new best friend.

What Is the WordPress Toolbar?
The WordPress toolbar is like the control centre of your website. It’s packed with essential tools that let you navigate your site, make quick edits, and keep everything running smoothly. Let’s take a look at its most useful features:
1. Quick Access to Your Dashboard
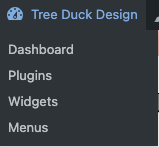
- The leftmost item on the toolbar is your site name. Hover over it, and you’ll see options to visit your dashboard, create new content, or edit your profile.
- This is your express route back to your site’s control center, no matter where you are on your site.
2. New Content Creation
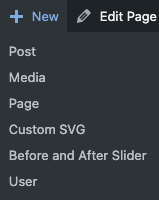
- The ‘+ New’ button on the toolbar is your shortcut to creating new content.
- Click it to quickly add a new post, page, media, or even a new user, depending on your permissions.
3. Site Management at a Glance
- The toolbar shows your site’s name and lets you quickly switch between sites if you manage multiple WordPress installations.
- It also displays update notifications for WordPress core, themes, and plugins – crucial for maintaining your site’s security and performance.
4. Customise Your Site On-the-Fly
- The ‘Customise’ option in the toolbar opens the WordPress Customiser.
- This lets you make real-time changes to your site’s appearance without leaving the page you’re on.
5. Quick Comment Moderation
- If your site uses comments, you’ll see a speech bubble icon that shows the number of comments awaiting moderation.
- This allows you to quickly approve, reply to, or delete comments from anywhere on your site.
6. Edit Content Directly
- When you’re viewing a page or post on your site, the toolbar will show an ‘Edit Page’ or ‘Edit Post’ option.
- This lets you jump straight into editing the content you’re currently viewing.
7. Search Your Site
- The toolbar includes a search function, allowing you to quickly find content across your entire site.
The Toolbar for Logged-Out Users
It’s worth noting that a simplified version of the toolbar appears for logged-out users if you’ve enabled it. This can include:
- A link to log in to the site
- Links to RSS feeds
- A search function
Customising the Toolbar
Did you know you can customise the WordPress toolbar? While you can’t directly add or remove items from the toolbar through WordPress settings, there are plugins available that allow you to modify it. This can be useful if you want to add quick links to frequently used areas of your site. You’ll also notice some plugins appear in the toolbar for easy access like your SEO and analytics tools.
Screen Options: The Hidden Powerhouse
Now, let’s talk about another often-overlooked feature that can dramatically improve your WordPress experience: Screen Options.

What Are Screen Options?
Screen Options is a drop-down panel located in the top-right corner of most WordPress admin pages. It’s easy to miss, but once you know it’s there, it becomes an invaluable tool for customising your WordPress admin experience.
How to Use Screen Options
- Look for the ‘Screen Options’ tab in the top-right corner of your WordPress admin pages.
- Click it to reveal a panel of checkboxes and options.
- These options allow you to customise what you see on the current admin page.
What Can You Do with Screen Options?
The available options in Screen Options vary depending on which admin page you’re on. Here are some examples:
1. On the Posts or Pages screen:
- Choose which columns to display (categories, tags, comments, etc.)
- Set the number of items to show per page
- Enable or disable the inline editor for quick edits
2. On the Dashboard:
- Select which widgets to display
- Customise your at-a-glance information
- Show or hide the welcome panel
3. In the Post Editor:
- Toggle the visibility of meta boxes (categories, tags, featured image, etc.)
- Enable/disable the full-height editor
- Show or hide the permalink below the post title
4. On the Plugins page:
- Choose which information to display for each plugin
- Set the number of plugins to show per page
5. In the Media Library:
- Switch between list and grid views
- Set the number of items to show per page
Why Screen Options Matter
Screen Options allow you to tailor your WordPress admin experience to your specific needs. By showing only the elements you use regularly, you can:
- Reduce clutter in your admin interface
- Focus on the most important information
- Speed up your workflow by having everything you need visible at once
- Customise different admin pages for different tasks
Pro Tip: Customise for Each User
If you have multiple users on your site, each user can set their own Screen Options preferences. This means each team member can customise their WordPress experience to suit their role and working style.
Combining the Toolbar and Screen Options for Maximum Efficiency
By mastering both the WordPress toolbar and Screen Options, you’re setting yourself up for incredibly efficient site management. The toolbar gives you quick access to key functions from anywhere on your site, while Screen Options let you customise your admin pages for optimum productivity.
Here’s a workflow tip: Use the toolbar to navigate quickly to different admin pages, then use Screen Options to ensure each page shows exactly what you need. This combination can significantly speed up your WordPress tasks.
For example:
- Use the toolbar to quickly navigate to your Posts page.
- Use Screen Options to display only the columns you need (like Title, Date, and Categories).
- Set the number of posts per page to a number that works for you.
- Now you have a streamlined view of your posts that’s perfect for quick content audits.
The Power of Familiarity
Here’s the thing about both the WordPress toolbar and Screen Options – the more you use them, the more valuable they become. They’re designed to save you time by providing instant access to key functions and customisation options.
I always encourage my clients to spend some time exploring these features. Click around the toolbar, see where each item leads, and what it does. Open Screen Options on different admin pages and experiment with the settings. You’ll quickly develop an intuitive sense of how to navigate and customise your site more efficiently.
Powerful Features
The WordPress toolbar and Screen Options might seem like small features, but they pack a powerful punch when it comes to site management. They put key functions and customisation options at your fingertips, whether you’re writing a new post, moderating comments, or tweaking your dashboard layout.
So next time you’re working on your WordPress site, remember to leverage both the toolbar at the top of your screen and the Screen Options in the upper right corner. They’re not just there for show – they’re your secret weapons for smoother, faster, and more personalised site management.
Remember, in the world of web design, efficiency and customisation are key. By mastering these often-overlooked WordPress features, you’re setting yourself up for quicker, more effective, and more enjoyable site management.
Ready to take your WordPress skills to the next level? Want a website that not only looks great but is easy to manage too? I’d love to chat about how we can make that happen. Get in touch, and let’s explore the possibilities of WordPress together!
After all, in the world of WordPress, the only limit is your imagination (and maybe your hosting plan, but that’s a topic for another day!).


